When I wonder why Americans are so averse to making flatbread at home—or are simply unaware of their easy-bake potential—I search for an elusive truth. Maybe one requires a lifelong familiarity with the feel of flatbread dough, with the mechanics of shaping it, or some special baking tool.
Pita stands out among its many cousins. In Istanbul, they make bazlama, a soft, pillowy flatbread that should be an essential part of a meal. And I often make the Italian flatbread, piadini, in a cast-iron skillet, a recipe developed here at Milk Street. But pita is different.
Pita has a pocket. It doesn’t have to be folded over a filling; the filling gets stuffed inside. This has made it a uniquely useful bread for millennia. In fact, the term “pikta” comes from the ancient Greek which, when passed into Latin, became “picta” or, in modern terms, pizza.
With that etymology in mind, one can think of pita bread as simply a form of pizza dough. Flour, water, salt, yeast (at least for most recipes), and maybe a little yogurt, lard or oil for richness. So we began our pita journey with a pizza dough recipe that had been developed by our resident baker, Erika Bruce. Its singular characteristic is the use of buttermilk powder.
Let’s start with the challenges with pita. First, we wanted good flavor. All-purpose flour alone doesn't muster much. Second, we wanted an elastic dough that was easy to roll out. Third, we wanted a soft, but chewy texture to the bread. And, most importantly, we wanted a method for getting the signature “puff.”
The first step was to switch out half of the white flour for whole wheat. This added a ton of flavor, but we felt the pita was lacking chew. Out went the all-purpose and in went bread flour in its place; now we had better texture. Bread flour also has more gluten than all-purpose, which is helpful since whole-wheat flour has less. Gluten helps produce an elastic dough than can hold in the steam. And that steam is key to puff.
Second, the dried buttermilk powder. Not something many people have on hand; ¼ cup of whole-milk yogurt was a better choice. This produced a soft, elastic dough and a tender but slightly chewy baked bread. Yogurt is common in some flatbreads, such as bazlama, but is not used in most pita recipes.
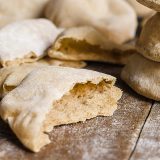
And then, of course, there was the puffing. Why does pita puff? The moisture inside the dough quickly turns to steam while the top and bottom layers set quickly, trapping the steam inside. For that to happen, it is essential that the dough be rolled out thinly so that the oven heat can penetrate quickly. Otherwise, you get a thicker flatbread with holes, but not one large pocket. We suggest rolling to ⅛ inch thick, in contrast to other recipes that suggest ¼ inch. This gave us 10 individual pitas from each batch of dough.
A word of caution: In my first try, I rolled it out a bit too thin. Keep in mind that the recipe calls for 5½-inch rounds, no larger. Pitas that were rolled too thin puffed nicely, but ended up more crispy than chewy once cooled. Place a slightly damp kitchen towel over the baked pitas when cooling to keep them soft. For baking, the oven needs to be as hot as possible—a full 500°F—and a heated baking steel is our top choice for surfaces (though a baking stone also works well).
Our biggest discovery was that most recipes suggest flipping the rounds of dough just before baking in an effort to produce even thickness, top and bottom. For us, this produced only sketchy puffing. For one batch, we forgot to turn the dough and the breads puffed nicely. It is true that without flipping the top of the pita will bake up thinner than the bottom but we feel this is a small sacrifice for puffery! It is also crucial to bake the dough seam side down. Seams are formed when the initial dough balls are shaped. The balls are rolled by hand, the top being a smooth surface and the bottom being where various folds are joined. I found two additional tricks. First, do not flour the counter while shaping the dough balls. You want the dough a tad sticky so it is easier to form into a ball.
Second, I cut the dough in half, then cut the half circles into even wedges in order to get same-sized pieces. Random division produces pitas of wildly different sizes. Even with that trick in mind, however, you are likely to end up with uneven pitas; it takes practice to make a perfectly even batch.
And now for the puffing. I made 10 pitas and seven of them turned out perfectly. The other three were partly puffed due to either poor shaping or imperfections when rolling. I think that means I’m batting 700, which isn’t bad for a rookie.