“What’s a kolache?” I asked my brother-in-law. He was zipping confidently through Houston traffic on a years-ago trip to the Lone Star state, and a neon sign for the Kolache Factory pierced the city skyline. A glazed expression dropped over his eyes.
“It’s kind of like a Danish,” he said. “They’re so good.” Cue my introduction to the soft, pillowy doughnut-Danish hybrids that reign supreme on the Texas pastry scene.
It wasn’t until Milk Street Magazine explored the origins of Texas Hill Country’s unexpected pastry darling that I learned why the kolache found footing in America’s southwest, of all places. The good news is, if you want to make one yourself without traveling, the kitchen team cracked the code for a winning recipe. And it’s the perfect project for the extra 24 hours we get this month, thanks to Leap Day.
Why Make Kolaches for Leap Day?
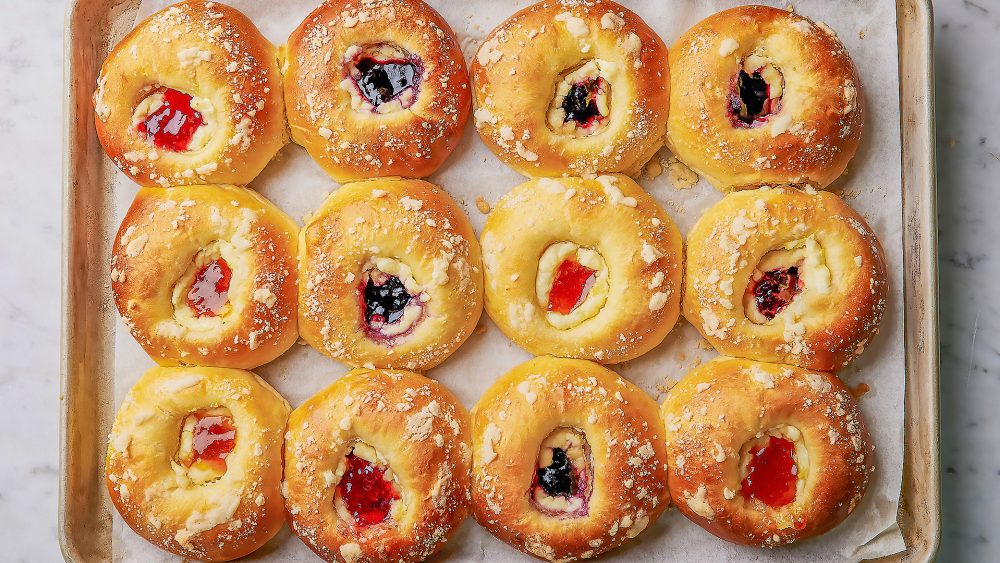
Boiled down, a kolache is a breakfast pastry made from enriched yeasted dough and traditionally filled with cheese or fruit. While they aren’t fussy—the ruler I use for croissants stayed in my drawer—good kolaches take time. You can rush it, but the pastry has just a few elements, so it’s worth taking the time to get each one right. There’s less to hide behind when a dish is simple.
Good Kolaches Focus on Flavor
A kolache starts with an enriched yeasted dough—melted butter, eggs and milk provide richness and flavor right off the bat. And they go in easily: The butter is melted and mixed with the other wet ingredients, rather than added one cold cube at a time until it incorporates (an annoying step in many other pastry and enriched bread recipes).
And, a benefit of the Milk Street recipe versus others out there? Our kitchen doesn’t ask you to make the Sophie’s choice between a cream cheese and a fruit filling (we’ll get into the details later); you get both. The dough gets a citrusy boost from lemon zest, which also goes into the cream cheese half of the filling. It’s noticeably sunny and floral—I love it.
The Magic is in the Kneading
Let me save you some time: If you don’t have a stand mixer, this is not the recipe for you. While there isn’t any complicated lamination, à la Danish or croissants, or intricate shaping, the recipe instructs us to knead to a certain texture. After combining the ingredients for the dough, you have to knead it on medium-high in a stand mixer with the dough hook attachment for about 10 minutes until you’re left with a shiny, elastic “rope” that falls from the hook. I would not attempt this by hand; my arms hurt just thinking about it. Plus, the dough is intentionally a bit sticky, therefore trickier to manage without machinery.
A Quick Rise, then a Long, Slow Rise, are Key
The other piece of magic here is in the rising schedule. A lot happens in the initial 45-minute rise on the countertop. That’s enough time for the dough to nearly double in size, which is relatively fast. I was surprised by this, until I remembered a detail from my absolute favorite Swedish Cardamom Bun recipe and touched the side of my mixing bowl. The dough was pretty warm right after kneading—logical, given that warm milk and room temperature ingredients were worked heavily for 12–15 minutes. (Yeast multiplies more quickly in warmer environments, sometimes working twice as fast as it would when cool.) So, set a timer here and check on your dough. It will double quickly. Don’t assume the recipe is underestimating the first rise.
Things slow down considerably after that. The dough moves to the fridge for 8 to 24 hours. I like this for a couple of reasons. One: It’s easier to split a multi-step project over two days, instead of being at the mercy of your recipe timetable for one stressful day. Two: The fridge acts as an unexpected safeguard. Moving the dough to the fridge cools everything down fast to prevent over-proofing, which can be the kiss of death for bakes. When a dough is over-proofed, the gluten breaks down too much to hold its structure, so the baked good can lose its shape or come out flat after all your work, or your yeast can get exhausted. (Yes. This is a thing.) The heat of the oven activates a last flurry of activity in your yeast for a last little bit of lift while baking, and this is much, much less likely in over-proofed dough. Tired yeast won’t be able to provide that last push.
And three: again, flavor. A long, slow rise in the fridge allows yeast to work slowly on the sugar and starches in the dough. In short, more fermentation = more complex, robust flavor in your final pastry. You’ve got 24 extra hours—let’s see what your yeast can do.
When in Doubt, Measure
Your cold, beautifully proofed dough will be easier to measure and shape. There’s a reason Milk Street recipes give you portion sizes for each individual pastry. For the most professional result, weigh each one.
And for the final rise, I whipped out my trusty Raisenne. I used to think dough risers were a gimmick, but ever since I started using one in my kitchen—which is somehow frigid year round—my final proofs on yeasted pastry have been so much more predictable and consistent. (By the way, as I researched kolache recipes, one consistent thread among purists was demanding three rises in a recipe for enhanced flavor and a pillowy crumb. Check.) I skipped it for the first rise in this recipe, as the dough was warm to the touch already, but got a good result for the final rise.
The final, fully proofed shaped buns should have expanded a bit by the end of your final rise (don’t worry about anything doubling), and after a gentle poke, the dough should spring back slowly—the perfect sweet spot. Dough that springs back too quickly means its yeast is still actively producing gas and expanding, a sign of under-proofed dough, while dough that doesn’t spring back at all means we’ve hit that dreaded overproof/exhausted yeast ceiling we wanted to avoid.
Chill. Your. Fillings!
One of our kitchen’s biggest takeaways when developing our kolache recipe was to chill our fillings. This single step makes all the difference between jam and cream cheese that slide off of a baking pastry versus some that stay snugly tucked in the center of a kolache. Just keep everything cold.
The internet’s kolache stalwarts offer the most variability on filling preferences. Some recipes use frozen fruit right from the bag, which I do not recommend without some sort of pre-cooking; the fruit will release moisture while it cooks, creating a soggy mess out of your delicate yeasted dough. Others used canned pie filling. I tend to find these too sweet. If you’re taking the time to make an enriched dough over nearly two days, spring for high-quality fruit preserves or jam. And our recipe cuts the cream cheese with just a touch of powdered sugar, not cupfuls, so it retains more of its tang. I used seedless black raspberry jam that played nicely off the citrusy, tart cream cheese filling.
A final dusting of streusel is optional, but I think you should try it. It offers a light crunch and texture that I really enjoy.
What to Do with Your Bounty
The recipe yields 12 buns. They’re best day of (can confirm), and they’ll hold up for another day after that. Based on comments from some readers who endorsed freezing, I wrapped half my batch in two layers of plastic wrap and stuck them in my freezer. I’ll see how they hold up in a few days and again in a couple of weeks. And if some of the kolaches don’t make it to a month, I can always make another batch. For research.
Join the conversation on Facebook, Instagram, TikTok and Pinterest.
And if you're looking for more Milk Street, check out our livestream cooking classes with our favorite chefs, home cooks and friends for global recipes, cooking methods and more.